Agents
Agent and access management for your service desk should be easy. Flexibility in adding, editing, invalidating access and a quick overview of which permissions a user has will help you maintain a clean permissions system and record of your setup in OTOBO.
OTOBO aids you giving you the power to manage agents within OTOBO across multiple back ends. OTOBO can use up-to ten back end sources, even marking some as read-only. Managing user settings centrally, an administrator can quickly invalidate a compromised account or set an account to out-of-office in case of an unexpected illness.
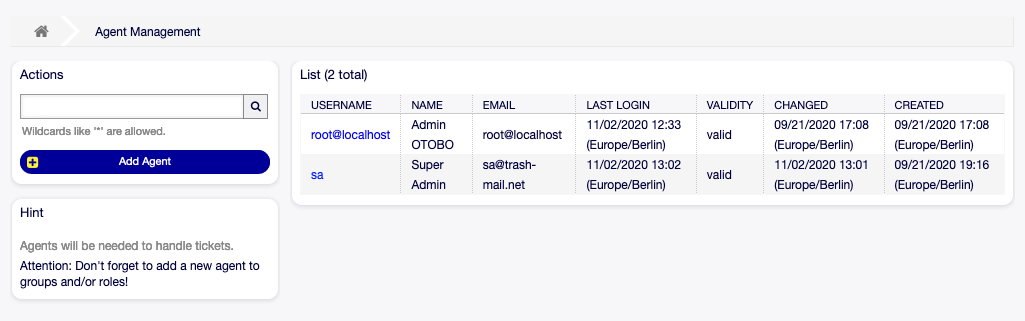
Use this screen to add agents to the system. A fresh OTOBO installation contains an agent with administrator privileges by default. The agent management screen is available in the Agents module of the Users, Groups & Roles group.
Agent Management Screen
Warning
The superuser account username is root@localhost. Don’t use the superuser account to work with OTOBO! Create new agents and work with these accounts instead. One of the adverse effects is that Access Control Lists (ACL) will not have an effect on this user.
Manage Agents
Note
Adding or editing an agent is possible only by using database back end. Using explicitly external directory services like LDAP and, based on configuration, some databases are read-only. Personal preferences like out-of-office can still be set.
To add an agent:
Click on the Add Agent button in the left sidebar.
Fill in the required fields.
Click on the Save button.
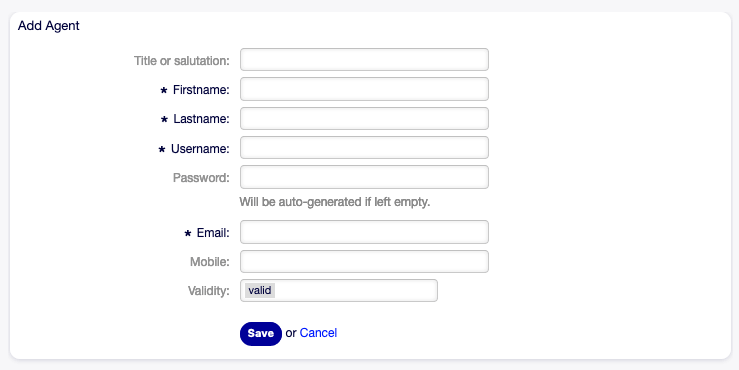
Add Agent Screen
Warning
Agents can not be deleted from the system. They can only be deactivated by setting the Validity option to invalid or invalid-temporarily.
To edit an agent:
Click on an agent in the list of agents.
Modify the fields.
Click on the Save or Save and finish button.
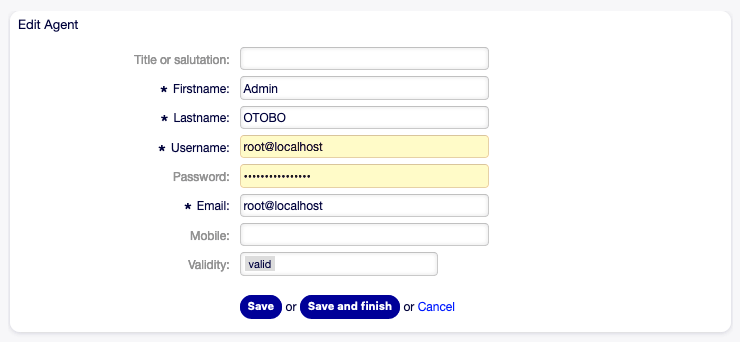
Edit Agent Screen
It is also possible to edit the agent personal preferences. To do this, click on the Edit personal preferences for this agent button in the left sidebar of the Edit Agent screen.
To find an agent:
Enter a search term to the search box in the left sidebar.
Click on the magnifying glass icon in the right part of the field or hit an
Enter.
Note
If several agents are added to the system, use the search box to find a particular agent. Only the first 1000 agents are listed by default.
The agent permissions can be controlled by adding an agent to Groups or Roles. This can result a complex matrix of permissions. The effective permissions for an agent can be checked in the bottom of the Edit Agent screen. If roles (recommended) are used, this screen will reflect the combined permissions as dictated by the roles.
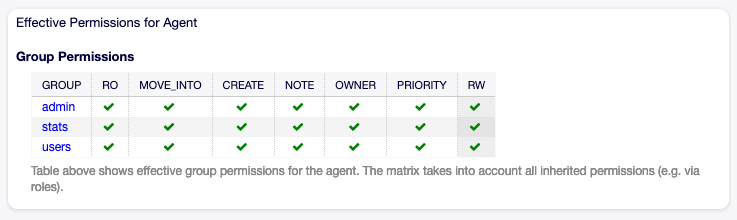
Effective Permissions for Agent Widget
Agent Settings
The following settings are available when adding or editing this resource. The fields marked with an asterisk are mandatory.
Note
These are the default fields available for the internal database table.
- Title or salutation
Some name prefix can be added here like Mr., Dr., Jr., etc.
- Firstname *
The first name of the agent.
- Lastname *
The last name of the agent.
See also
The agent display name can be set via the system configuration setting
FirstnameLastnameOrder.- Username *
The username of the agent to login to the system.
- Password
The password of the agent. This will be auto-generated if left empty.
- Email *
The email address of the agent.
Note
The email syntax and validity of an available MX record could prevent you from submitting this form. For some systems it may be acceptable to turn off these checks. See the Agent Configuration Options.
- Mobile
The mobile phone number of the agent.
- Validity *
Set the validity of this resource. Each resource can be used in OTOBO only, if this field is set to valid. Setting this field to invalid or invalid-temporarily will disable the use of the resource.
Agent Back End Sources
Agents can be read and synchronized from an Active Directory® or LDAP server.
Note
The following configurations are taken care of by the Customer Solution Team in OTOBO. Please contact the Customer Solution Team via support@otrs.ch or in the OTOBO Portal.
Agent Authentication Back End
The users table houses your agent data per default. You may attach a directory server (LDAP/Active Directory) to your installation for authentication. To achieve this copy the following block from the Defaults.pm and paste it into the Config.pm.
# This is an example configuration for an LDAP auth. backend.
# (take care that Net::LDAP is installed!)
#    $Self->{AuthModule} = 'Kernel::System::Auth::LDAP';
#    $Self->{'AuthModule::LDAP::Host'} = 'ldap.example.com';
#    $Self->{'AuthModule::LDAP::BaseDN'} = 'dc=example,dc=com';
#    $Self->{'AuthModule::LDAP::UID'} = 'uid';

# Check if the user is allowed to auth in a posixGroup
# (e. g. user needs to be in a group xyz to use otobo)
#    $Self->{'AuthModule::LDAP::GroupDN'} = 'cn=otoboallow,ou=posixGroups,dc=example,dc=com';
#    $Self->{'AuthModule::LDAP::AccessAttr'} = 'memberUid';
# for ldap posixGroups objectclass (just uid)
#    $Self->{'AuthModule::LDAP::UserAttr'} = 'UID';
# for non ldap posixGroups objectclass (with full user dn)
#    $Self->{'AuthModule::LDAP::UserAttr'} = 'DN';

# The following is valid but would only be necessary if the
# anonymous user do NOT have permission to read from the LDAP tree
#    $Self->{'AuthModule::LDAP::SearchUserDN'} = '';
#    $Self->{'AuthModule::LDAP::SearchUserPw'} = '';

# in case you want to add always one filter to each ldap query, use
# this option. e. g. AlwaysFilter => '(mail=*)' or AlwaysFilter => '(objectclass=user)'
# or if you want to filter with a locigal OR-Expression, like AlwaysFilter => '(|(mail=*abc.com)(mail=*xyz.com))'
#    $Self->{'AuthModule::LDAP::AlwaysFilter'} = '';

# in case you want to add a suffix to each login name, then
# you can use this option. e. g. user just want to use user but
# in your ldap directory exists user@domain.
#    $Self->{'AuthModule::LDAP::UserSuffix'} = '@domain.com';

# In case you want to convert all given usernames to lower letters you
# should activate this option. It might be helpful if databases are
# in use that do not distinguish selects for upper and lower case letters
# (Oracle, postgresql). User might be synched twice, if this option
# is not in use.
#    $Self->{'AuthModule::LDAP::UserLowerCase'} = 0;

# In case you need to use OTOBO in iso-charset, you can define this
# by using this option (converts utf-8 data from LDAP to iso).
#    $Self->{'AuthModule::LDAP::Charset'} = 'iso-8859-1';

# Net::LDAP new params (if needed - for more info see perldoc Net::LDAP)
#    $Self->{'AuthModule::LDAP::Params'} = {
#        port    => 389,
#        timeout => 120,
#        async   => 0,
#        version => 3,
#    };

# Die if backend can't work, e. g. can't connect to server.
#    $Self->{'AuthModule::LDAP::Die'} = 1;

You should uncomment the following settings as a minimum.
The minimum required to connect to a directory server is:
$Self->{AuthModule} = 'Kernel::System::Auth::LDAP';
$Self->{'AuthModule::LDAP::Host'} = 'ldap.example.com';
$Self->{'AuthModule::LDAP::BaseDN'} = 'dc=example,dc=com';
$Self->{'AuthModule::LDAP::UID'} = 'uid';
HostThe DNS name or IP of your directory server.
BaseDNThe starting point in your directory tree.
UIDThe attribute used for login and identification.
Note
This is
sAMAccountNamefor an Active Directory.
To use multiple back ends, add an additional section of the example code to the Config.pm. Please make sure to add a numeric value [1-9] to all settings to indicate which settings belong to which back end.
### Backend One
$Self->{AuthModule} = 'Kernel::System::Auth::LDAP';
$Self->{'AuthModule::LDAP::Host'} = 'ldap.example.com';
$Self->{'AuthModule::LDAP::BaseDN'} = 'dc=example,dc=com';
$Self->{'AuthModule::LDAP::UID'} = 'uid';

### Backend Two
$Self->{AuthModule1} = 'Kernel::System::Auth::LDAP';
$Self->{'AuthModule::LDAP::Host1'} = 'ldap.example.com';
$Self->{'AuthModule::LDAP::BaseDN1'} = 'dc=example,dc=com';
$Self->{'AuthModule::LDAP::UID1'} = 'uid';
Warning
All back ends will are used in succession. The UID must be unique to all back ends, otherwise some side effects may occur.
To synchronize with a specific directory server (see Agent User Data below), you must add the appropriate setting to your Agent Authentication Back End. To achieve this copy the following block from the Defaults.pm and paste it into the Config.pm.
$Self->{'AuthModule::UseSyncBackend'} = 'AuthSyncBackend';
To use multiple back ends, add an additional section of the example code to the Config.pm. Please make sure to add a numeric value [1-9] to all settings to indicate which settings belong to which back end.
$Self->{'AuthModule::UseSyncBackend1'} = 'AuthSyncBackend1';
Reuse of an Agent Synchronization Back End is also possible.
$Self->{'AuthModule::UseSyncBackend1'} = 'AuthSyncBackend';
Agent Synchronization Back End
It is advisable to synchronize the agent data so that agents need not be manually added to the users table prior to authorization. Additionally, groups and roles can be added automatically using security objects of the directory server.
Agent User Data
Syncing user data upon login. To achieve this copy the following block from the Defaults.pm and paste it into the Config.pm.
# This is an example configuration for an LDAP auth sync. backend.
# (take care that Net::LDAP is installed!)
#    $Self->{AuthSyncModule} = 'Kernel::System::Auth::Sync::LDAP';
#    $Self->{'AuthSyncModule::LDAP::Host'} = 'ldap.example.com';
#    $Self->{'AuthSyncModule::LDAP::BaseDN'} = 'dc=example,dc=com';
#    $Self->{'AuthSyncModule::LDAP::UID'} = 'uid';

# The following is valid but would only be necessary if the
# anonymous user do NOT have permission to read from the LDAP tree
#    $Self->{'AuthSyncModule::LDAP::SearchUserDN'} = '';
#    $Self->{'AuthSyncModule::LDAP::SearchUserPw'} = '';

# in case you want to add always one filter to each ldap query, use
# this option. e. g. AlwaysFilter => '(mail=*)' or AlwaysFilter => '(objectclass=user)'
# or if you want to filter with a logical OR-Expression, like AlwaysFilter => '(|(mail=*abc.com)(mail=*xyz.com))'
#    $Self->{'AuthSyncModule::LDAP::AlwaysFilter'} = '';

# AuthSyncModule::LDAP::UserSyncMap
# (map if agent should create/synced from LDAP to DB after successful login)
# you may specify LDAP-Fields as either
#  * list, which will check each field. first existing will be picked ( ["givenName","cn","_empty"] )
#  * name of an LDAP-Field (may return empty strings) ("givenName")
#  * fixed strings, prefixed with an underscore: "_test", which will always return this fixed string
#    $Self->{'AuthSyncModule::LDAP::UserSyncMap'} = {
#        # DB -> LDAP
#        UserFirstname => 'givenName',
#        UserLastname  => 'sn',
#        UserEmail     => 'mail',
#    };
The minimum required to connect to a directory server is:
$Self->{AuthSyncModule} = 'Kernel::System::Auth::Sync::LDAP';
$Self->{'AuthSyncModule::LDAP::Host'} = 'ldap.example.com';
$Self->{'AuthSyncModule::LDAP::BaseDN'} = 'dc=example,dc=com';
$Self->{'AuthSyncModule::LDAP::UID'} = 'uid';
HostThe DNS name or IP of your directory server.
BaseDNThe starting point in your directory tree.
UIDThe attribute used for login and identification.
Note
This is
sAMAccountNamefor an Active Directory.
Note
Multiple Agent Synchronization Back End blocks can be used. Please make sure to add a numeric value [1-9] to all settings to indicate which settings belong to which back end. Each AuthSyncModule must be explicitly used in an Agent Authentication Back End.
Agent Group Data
It is possible to use security objects to synchronize users to OTOBO groups. To achieve this copy the following block from the Defaults.pm and paste it into the Config.pm.
Note
Groups must be available in OTOBO to use this feature.
Agent Role Data
It is possible to use security objects to synchronize users to OTOBO roles. To achieve this copy the following block from the Defaults.pm and paste it into the Config.pm.
Note
Roles must be available in OTOBO to use this feature.