Customer Users
A record of who your company deals with requires more information about that individual: physical location for shipping and billing purposes, as well as contact information for email and phone contact.
OTOBO offers a great way to save individual information about contacts within organizations which your company serves. You can add as many personal connections into OTOBO as needed.
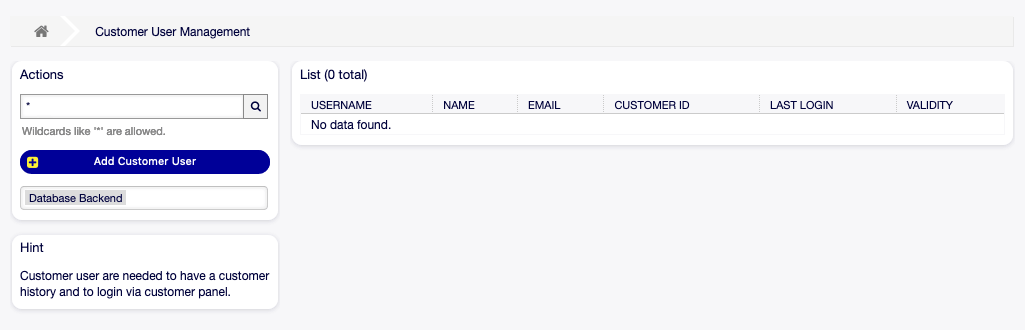
Use this screen to add a customer user to the system. A fresh OTOBO installation contains no customer users by default. The customer user management screen is available in the Customer Users module of the Users, Groups & Roles group.
Customer User Management Screen
Manage Customer Users
Warning
A customer user can only be added to the system when at least one customer exists. Create one or more Customers first.
Note
Adding or editing a customer user is possible only by using database back end. Using external directory services like LDAP will disable the customer user management functionality.
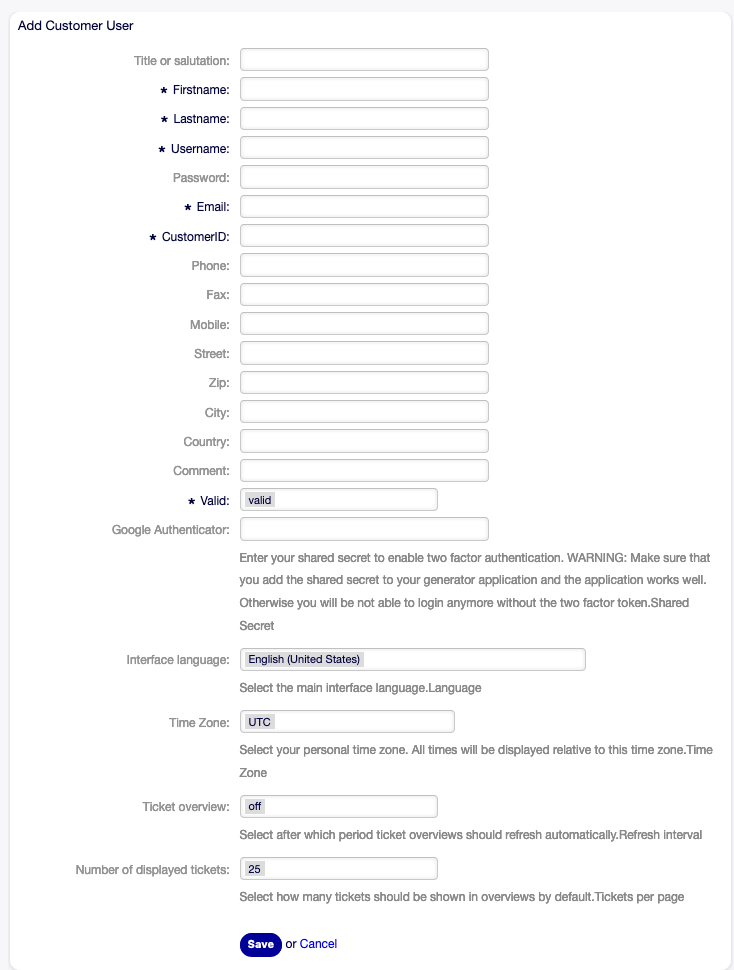
To add a customer user:
Click on the Add Customer User button in the left sidebar.
Fill in the required fields.
Click on the Save button.
Add Customer User Screen
Warning
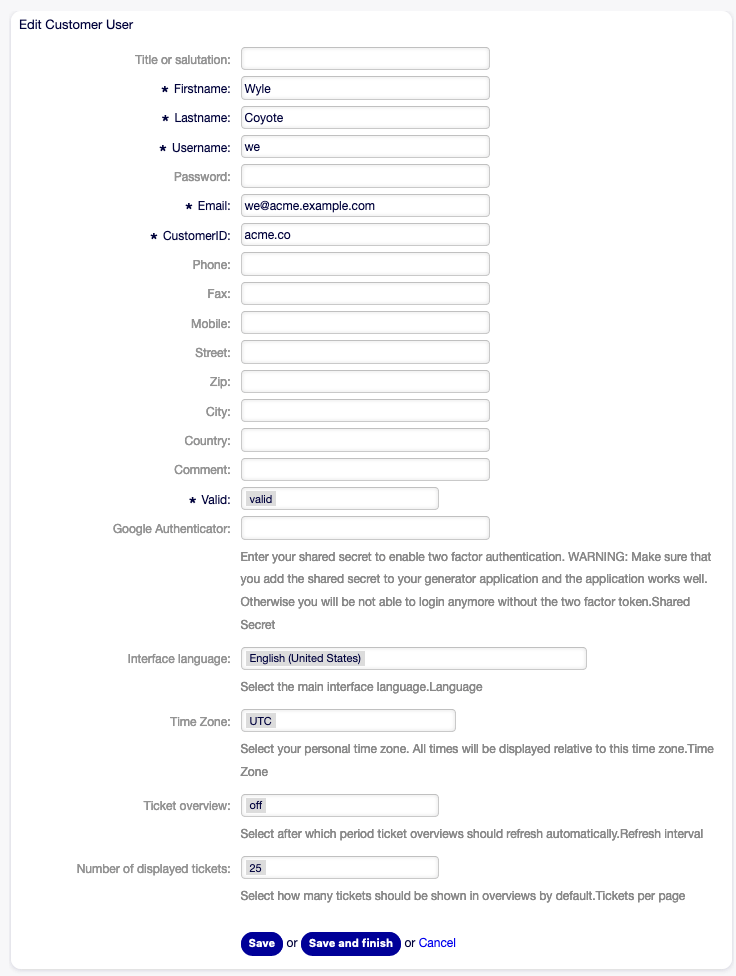
Customer users can not be deleted from the system. They can only be deactivated by setting the Validity option to invalid or invalid-temporarily.
To edit a customer user:
Click on a customer user in the list of customer users.
Modify the fields.
Click on the Save or Save and finish button.
Edit Customer User Screen
To find a customer user:
Enter a search term to the search box in the left sidebar.
Click on the magnifying glass icon in the right part of the field or hit an
Enter.
Note
If several customer users are added to the system, use the search box to find a particular customer user. Only the first 1000 customer users are listed by default.
The customer user permissions can be controlled by adding a customer or a customer user to Groups. This can result a complex matrix of permissions. The effective permissions for a customer user can be checked in the bottom of the Edit Customer User screen.
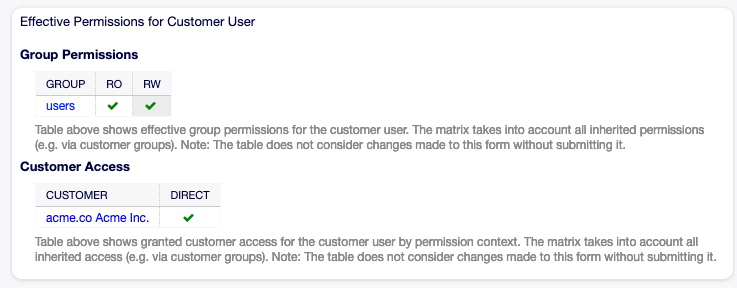
Effective Permissions for Customer User Widget
See also
Customer Users ↔ Groups needs to be enabled to use this feature.
Customer User Settings
The following settings are available when adding or editing this resource. The fields marked with an asterisk are mandatory.
Note
These are the default fields available for the internal database table.
- Title or salutation
Some name prefix can be added here like Mr., Dr., Jr., etc.
- Firstname *
The first name of the customer user.
- Lastname *
The last name of the customer user.
- Username *
The username of the customer user to login to the system.
- Password
The password of the customer user. This will be auto-generated if left empty.
- Email *
The email address of the customer user.
- CustomerID *
The ID of the customer company the customer user belongs to. Select a customer from the list of Customers.
- Phone
The phone number of the customer user.
- Fax
The fax number of the customer user.
- Mobile
The cellphone number of the customer user.
- Street
The street name of the customer.
- Zip
The zip code of the customer.
- City
The headquarter city of the customer.
- Country
The country of the customer user.
- Comment
Add additional information to this resource. It is recommended to always fill this field as a description of the resource with a full sentence for better clarity, because the comment will be also displayed in the overview table.
- Valid *
Set the validity of this resource. Each resource can be used in OTOBO only, if this field is set to valid. Setting this field to invalid or invalid-temporarily will disable the use of the resource.
See also
It is possible to assign multiple customers to customer users via the Customer Users ↔ Customers screen.
Customer User Back Ends
The system works with many customer user data attributes such as username, email address, phone number, etc. These attributes are displayed in both the agent and the external interface, and also used for the authentication of customer users.
Customer data used or displayed within the system is highly customizable. The user login and the email address are always needed for customer authentication.
You can use two types of customer back end: database or LDAP. If you already have another customer back end (e.g. SAP), it is possible to write a module that uses it.
The administrator interface does not support the configuration of external back ends. Administrators need to edit the file Kernel/Config.pm by copying and pasting code snippets from Kernel/Config/Defaults.pm manually.
Warning
Do not modify the file Kernel/Config/Defaults.pm, it will be overwritten after upgrading the system! Copy and paste the code snippets into Kernel/Config.pm instead.
Database
This is the default customer user back end for new installations. The example below shows the configuration of a database customer back end, which uses customer user data stored in the database table customer_user.
    # CustomerUser
    # (customer user database backend and settings)
    $Self->{CustomerUser} = {
        Name   => Translatable('Database Backend'),
        Module => 'Kernel::System::CustomerUser::DB',
        Params => {

            # if you want to use an external database, add the
            # required settings
#            DSN  => 'DBI:odbc:yourdsn',
#            Type => 'mssql', # only for ODBC connections
#            DSN => 'DBI:mysql:database=customerdb;host=customerdbhost',
#            User => '',
#            Password => '',
            Table => 'customer_user',
#            ForeignDB => 0,    # set this to 1 if your table does not have create_time, create_by, change_time and change_by fields

            # CaseSensitive defines if the data storage of your DBMS is case sensitive and will be
            # preconfigured within the database driver by default.
            # If the collation of your data storage differs from the default settings,
            # you can set the current behavior ( either 1 = CaseSensitive or 0 = CaseINSensitive )
            # to fit your environment.
            #
#            CaseSensitive => 0,

            # SearchCaseSensitive will control if the searches within the data storage are performed
            # case sensitively (if possible) or not. Change this option to 1, if you want to search case sensitive.
            # This can improve the performance dramatically on large databases.
            SearchCaseSensitive => 0,
        },

        # customer unique id
        CustomerKey => 'login',

        # customer #
        CustomerID    => 'customer_id',
        CustomerValid => 'valid_id',

        # The last field must always be the email address so that a valid
        #   email address like "John Doe" <john.doe@domain.com> can be constructed from the fields.
        CustomerUserListFields => [ 'first_name', 'last_name', 'email' ],

#        CustomerUserListFields => ['login', 'first_name', 'last_name', 'customer_id', 'email'],
        CustomerUserSearchFields           => [ 'login', 'first_name', 'last_name', 'customer_id' ],
        CustomerUserSearchPrefix           => '*',
        CustomerUserSearchSuffix           => '*',
        CustomerUserSearchListLimit        => 250,
        CustomerUserPostMasterSearchFields => ['email'],
        CustomerUserNameFields             => [ 'title', 'first_name', 'last_name' ],
        CustomerUserEmailUniqCheck         => 1,

#        # Configures the character for joining customer user name parts. Join single space if it is not defined.
#        # CustomerUserNameFieldsJoin => '',

#        # show now own tickets in customer panel, CompanyTickets
#        CustomerUserExcludePrimaryCustomerID => 0,
#        # generate auto logins
#        AutoLoginCreation => 0,
#        # generate auto login prefix
#        AutoLoginCreationPrefix => 'auto',
#        # admin can change customer preferences
#        AdminSetPreferences => 1,
        # use customer company support (reference to company, See CustomerCompany settings)
        CustomerCompanySupport => 1,
        # cache time to live in sec. - cache any database queries
        CacheTTL => 60 * 60 * 24,
#        # Consider this source read only.
#        ReadOnly => 1,
        Map => [

            # Info about dynamic fields:
            #
            # Dynamic Fields of type CustomerUser can be used within the mapping (see example below).
            # The given storage (third column) then can also be used within the following configurations (see above):
            # CustomerUserSearchFields, CustomerUserPostMasterSearchFields, CustomerUserListFields, CustomerUserNameFields
            #
            # Note that the columns 'frontend' and 'readonly' will be ignored for dynamic fields.

            # note: Login, Email and CustomerID needed!
            # var, frontend, storage, shown (1=always,2=lite), required, storage-type, http-link, readonly, http-link-target, link class(es)
            [ 'UserTitle',        Translatable('Title or salutation'), 'title',          1, 0, 'var', '', 0, undef, undef ],
            [ 'UserFirstname',    Translatable('Firstname'),           'first_name',     1, 1, 'var', '', 0, undef, undef ],
            [ 'UserLastname',     Translatable('Lastname'),            'last_name',      1, 1, 'var', '', 0, undef, undef ],
            [ 'UserLogin',        Translatable('Username'),            'login',          1, 1, 'var', '', 0, undef, undef ],
            [ 'UserPassword',     Translatable('Password'),            'pw',             0, 0, 'var', '', 0, undef, undef ],
            [ 'UserEmail',        Translatable('Email'),               'email',          1, 1, 'var', '', 0, undef, undef ],
#            [ 'UserEmail',        Translatable('Email'),               'email',          1, 1, 'var', '[% Env("CGIHandle") %]?Action=AgentTicketCompose;ResponseID=1;TicketID=[% Data.TicketID | uri %];ArticleID=[% Data.ArticleID | uri %]', 0, '', 'AsPopup OTOBOPopup_TicketAction' ],
            [ 'UserCustomerID',   Translatable('CustomerID'),          'customer_id',    0, 1, 'var', '', 0, undef, undef ],
#            [ 'UserCustomerIDs',  Translatable('CustomerIDs'),         'customer_ids',   1, 0, 'var', '', 0, undef, undef ],
            [ 'UserPhone',        Translatable('Phone'),               'phone',          1, 0, 'var', '', 0, undef, undef ],
            [ 'UserFax',          Translatable('Fax'),                 'fax',            1, 0, 'var', '', 0, undef, undef ],
            [ 'UserMobile',       Translatable('Mobile'),              'mobile',         1, 0, 'var', '', 0, undef, undef ],
            [ 'UserStreet',       Translatable('Street'),              'street',         1, 0, 'var', '', 0, undef, undef ],
            [ 'UserZip',          Translatable('Zip'),                 'zip',            1, 0, 'var', '', 0, undef, undef ],
            [ 'UserCity',         Translatable('City'),                'city',           1, 0, 'var', '', 0, undef, undef ],
            [ 'UserCountry',      Translatable('Country'),             'country',        1, 0, 'var', '', 0, undef, undef ],
            [ 'UserComment',      Translatable('Comment'),             'comments',       1, 0, 'var', '', 0, undef, undef ],
            [ 'ValidID',          Translatable('Valid'),               'valid_id',       0, 1, 'int', '', 0, undef, undef ],

            # Dynamic field example
#            [ 'DynamicField_Name_X', undef, 'Name_X', 0, 0, 'dynamic_field', undef, 0, undef, undef ],
        ],

        # default selections
        Selections => {

#            UserTitle => {
#                'Mr.' => Translatable('Mr.'),
#                'Mrs.' => Translatable('Mrs.'),
#            },
        },
    };
If you want to customize the customer user data, change the columns or add new ones to the customer_user table in the database.
For example, to add a new field for room number:
Add a new column
roomto tablecustomer_user.MySQL or MariaDB:
root> mysql -u root -p -e 'ALTER TABLE otobo.customer_user ADD room VARCHAR (250)'
PostgreSQL (from the
/opt/otobodirectory):otobo> psql -c 'ALTER TABLE customer_user ADD COLUMN room varchar(250)'
Copy the
$Self->{CustomerUser}section fromKernel/Config/Defaults.pmintoKernel/Config.pm.Add the new column to the
Maparray.[ 'UserRoom', 'Room', 'room', 0, 1, 'var', '', 0, undef, undef ],
You can set the HTTP link target and link class (the last two keys) to
undefin map array elements, if they are not to be used. These keys addtarget=""andclass=""attributes to the HTTP link element, respectively. They are ignored if HTTP link is not set (it is''in this example).Note
It is recommended to always use English words for names.
See also
Names can be translated into other languages with custom translation files. See the Custom Translation File chapter in the developer manual.
LDAP
If you have an LDAP directory with your customer user data, you can use it as the customer user back end. The example below shows the configuration of a LDAP customer user back end.
# CustomerUser
# (customer user ldap backend and settings)
    $Self->{CustomerUser} = {
        Name => 'LDAP Backend',
        Module => 'Kernel::System::CustomerUser::LDAP',
        Params => {
            # ldap host
            Host => 'bay.csuhayward.edu',
            # ldap base dn
            BaseDN => 'ou=seas,o=csuh',
            # search scope (one|sub)
            SSCOPE => 'sub',
            # The following is valid but would only be necessary if the
            # anonymous user does NOT have permission to read from the LDAP tree
            UserDN => '',
            UserPw => '',
            # in case you want to add always one filter to each ldap query, use
            # this option. e. g. AlwaysFilter => '(mail=*)' or AlwaysFilter => '(objectclass=user)'
            AlwaysFilter => '',
            # if the charset of your ldap server is iso-8859-1, use this:
#            # SourceCharset => 'iso-8859-1',
            # die if backend can't work, e. g. can't connect to server
            Die => 0,
            # Net::LDAP new params (if needed - for more info see perldoc Net::LDAP)
            Params => {
                port    => 389,
                timeout => 120,
                async   => 0,
                version => 3,
            },
        },
        # customer unique id
        CustomerKey => 'uid',
        # customer #
        CustomerID => 'mail',
        CustomerUserListFields => ['cn', 'mail'],
        CustomerUserSearchFields => ['uid', 'cn', 'mail'],
        CustomerUserSearchPrefix => '',
        CustomerUserSearchSuffix => '*',
        CustomerUserSearchListLimit => 250,
        CustomerUserPostMasterSearchFields => ['mail'],
        CustomerUserNameFields => ['givenname', 'sn'],
        # Configures the character for joining customer user name parts. Join single space if it is not defined.
        CustomerUserNameFieldsJoin => '',
        # show customer user and customer tickets in the external interface
        CustomerUserExcludePrimaryCustomerID => 0,
        # add a ldap filter for valid users (expert setting)
#        # CustomerUserValidFilter => '(!(description=gesperrt))',
        # admin can't change customer preferences
        AdminSetPreferences => 0,
        # cache time to live in sec. - cache any ldap queries
#        CacheTTL => 0,
        Map => [
            # note: Login, Email and CustomerID needed!
            # var, frontend, storage, shown (1=always,2=lite), required, storage-type, http-link, readonly, http-link-target, link class(es)
            [ 'UserTitle',       Translatable('Title or salutation'), 'title',               1, 0, 'var', '', 1, undef, undef ],
            [ 'UserFirstname',   Translatable('Firstname'),           'givenname',           1, 1, 'var', '', 1, undef, undef ],
            [ 'UserLastname',    Translatable('Lastname'),            'sn',                  1, 1, 'var', '', 1, undef, undef ],
            [ 'UserLogin',       Translatable('Username'),            'uid',                 1, 1, 'var', '', 1, undef, undef ],
            [ 'UserEmail',       Translatable('Email'),               'mail',                1, 1, 'var', '', 1, undef, undef ],
            [ 'UserCustomerID',  Translatable('CustomerID'),          'mail',                0, 1, 'var', '', 1, undef, undef ],
            # [ 'UserCustomerIDs', Translatable('CustomerIDs'),         'second_customer_ids', 1, 0, 'var', '', 1, undef, undef ],
            [ 'UserPhone',       Translatable('Phone'),               'telephonenumber',     1, 0, 'var', '', 1, undef, undef ],
            [ 'UserAddress',     Translatable('Address'),             'postaladdress',       1, 0, 'var', '', 1, undef, undef ],
            [ 'UserComment',     Translatable('Comment'),             'description',         1, 0, 'var', '', 1, undef, undef ],

            # this is needed, if "SMIME::FetchFromCustomer" is active
            # [ 'UserSMIMECertificate', 'SMIMECertificate', 'userSMIMECertificate', 0, 1, 'var', '', 1, undef, undef ],

            # Dynamic field example
            # [ 'DynamicField_Name_X', undef, 'Name_X', 0, 0, 'dynamic_field', undef, 0, undef, undef ],
        ],
    };
To activate and configure the LDAP back end:
Copy the
$Self->{CustomerUser}section fromKernel/Config/Defaults.pmintoKernel/Config.pm.Remove the comments (
#characters) from the beginning of the lines.
If additional customer user attributes are stored in your LDAP directory, such as a manager name, a mobile phone number, or a department, this information can be displayed in OTOBO.
To display additional customer user attributes from LDAP directory:
Expand the
Maparray inKernel/Config.pmwith the entries for these attributes.[ 'UserMobilePhone', 'Mobile Phone', 'mobilephone', 1, 0, 'var', '', 1, undef, undef ],
Note
It is recommended to always use English words for names.
See also
Names can be translated into other languages with custom translation files. See the Custom Translation File chapter in the developer manual.
Multiple Customer User Back Ends
If you want to use more than one customer user data source, the CustomerUser configuration parameter should be expanded with a number, like CustomerUser1 and CustomerUser2.
The following configuration example shows usage of both a database and an LDAP customer user back end.
# Data source 1: customer user database back end and settings.
    $Self->{CustomerUser1} = {
        Name   => 'Database Backend',
        Module => 'Kernel::System::CustomerUser::DB',
        Params => {
            DSN => 'DBI:odbc:yourdsn',
            DSN => 'DBI:mysql:database=customerdb;host=customerdbhost',
            User => '',
            Password => '',
            Table => 'customer_user',
        },
        # Other setting here.
    };

# Data source 2: customer user LDAP back end and settings.
    $Self->{CustomerUser2} = {
        Name => 'LDAP Backend',
        Module => 'Kernel::System::CustomerUser::LDAP',
        Params => {
            Host => 'bay.csuhayward.edu',
            BaseDN => 'ou=seas,o=csuh',
            SSCOPE => 'sub',
            UserDN => '',
            UserPw => '',
            AlwaysFilter => '',
            Die => 0,
            Params => {
                port    => 389,
                timeout => 120,
                async   => 0,
                version => 3,
            },
        },
        # Other setting here.
    };
It is possible to integrate up to 10 different customer back ends. Use the Customer Users screen to view or edit (assuming write access is enabled) all customer user data.
Customer User Data in Dynamic Fields
Sometimes it can be useful to also store customer user data directly in dynamic fields of a ticket, for example to create special statistics on this data.
The dynamic field values are set, when a ticket is created or when the customer user of a ticket is changed. The values of the dynamic fields are taken from the customer user data. This works for all back ends, but is especially useful for LDAP back ends.
To activate this optional feature:
Activate the setting
Ticket::EventModulePost###4100-DynamicFieldFromCustomerUser.Activate the setting
DynamicFieldFromCustomerUser::Mapping. This setting contains the configuration of which customer user field entry should be stored in which ticket dynamic field.Create the dynamic fields, if the dynamic fields are not present in the system yet.
Enable the dynamic fields in setting
Ticket::Frontend::AgentTicketFreeText###DynamicField, so that they can be set manually.Note
The dynamic field must not be enabled in the following settings:
Ticket::Frontend::AgentTicketPhone###DynamicFieldTicket::Frontend::AgentTicketEmail###DynamicFieldTicket::Frontend::AgentTicketCustomer###DynamicField
If they were, they would have precedence over the automatically set values.