Kerberos Single Sign On in OTOBO Docker installation
Please read to the chapter Installing using Docker and Docker Compose for basic information about installing and configure OTOBO. This tutorial assumes that OTOBO has been installed and configured using Docker.
Note
In the following, we will refer from AD (Active Directory), of course the Kerberos configuration is also possible under LDAP.
Generate Active Directory User
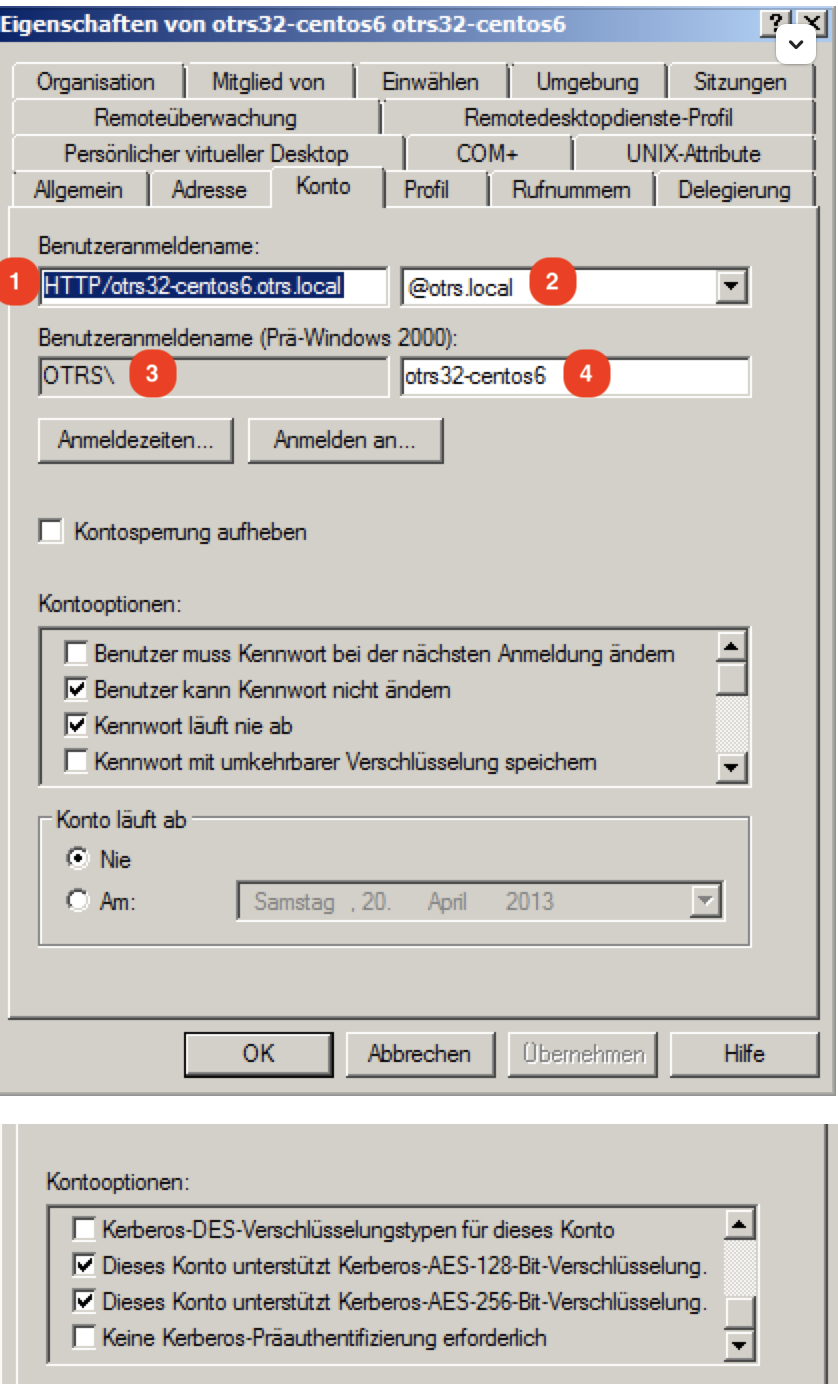
Please create a new Active Directory User with the following settings and save the marked settings:
Note
Please use as Username only this syntax: HTTP/fqdn.from.your.otobo.de. fqdn.from.your.otobo.de needs to be a A-Record DNS entry, not a CNAME! In the next step, it is also possible to use other URLs for OTOBO, they must then point as CNAME to our A-record defined above.
The username part “HTTP/” should be written in capital letters, as Kerberos expects it that way.
The password doesn’t work properly with some special characters (e.g. ‘&’).
You have to create a seperate AD-user. You can not use the one that you already use for your LDAP/AD sync.
Generate Active Directory Keytab file
In the next step, we connect to a domain controller of the Active Directory and open a console (cmd) there with administrator privileges. Now we use the tool ktpass.exe to generate the needed keytab file:
ktpass.exe -princ HTTP/otrs32-centos6.otrs.local@OTRS.LOCAL -mapuser OTRS\otrs32-centos6 -crypto All -pass Password -ptype KRB5_NT_PRINCIPAL -out c:\krb5.keytab
-princ = HTTP/otrs32-centos6.otrs.local@OTRS.LOCAL -> Picture Number 1+@+Picture Number 2
-mapuser = OTRSotrs32-centos6 (Username prä Win 2000) -> -> Picture Number 3++Picture Number
-pass = Password from user otrs32-centos6 (Active Directory User)
-out = c:/krb5.keytab
Note
Please write the domain (@OTRS.LOCAL) always in capital letters. The password must not contain some special characters.
In the next step please move the krb5.keytab file to the OTOBO Server:
# Create new directory
docker_admin> mkdir /opt/otobo-docker/nginx-conf

# Move the file krb5.keytab to the new directory (Attention, depending on where you have placed the krb5.conf file, the command below will change.)
docker_admin> mv ?/krb5.keytab /opt/otobo-docker/nginx-conf/krb5.keytab
Create a new volume for your custom nginx configuration
docker volume create otobo_nginx_custom_config
otobo_nginx_custom_config_mp=$(docker volume inspect --format '{{ .Mountpoint }}' otobo_nginx_custom_config)
docker create --name tmp-nginx-container rotheross/otobo-nginx-webproxy:latest-10_1 (achtung: Versionsnummer)
docker cp tmp-nginx-container:/etc/nginx/templates /tmp
docker cp tmp-nginx-container:/etc/nginx/templates/otobo_nginx-kerberos.conf.template.hidden $otobo_nginx_custom_config_mp/otobo_nginx.conf.template
docker rm tmp-nginx-container
vim docker-compose/otobo-nginx-custom-config.yml
COMPOSE_FILE =>
docker-compose/otobo-nginx-custom-config.yml
NGINX_ENVSUBST_TEMPLATE_DIR=/etc/nginx/config/template-custom
Create new OTOBO .env file
First of all we need to move the old file /opt/otobo-docker/.env to .env.tmp and create a new .env file including the kerberos settings.
# Stop OTOBO Container if running
docker_admin>cd /opt/otobo-docker
docker_admin>docker-compose down

# create a backup of the old .env file
docker_admin>mv /opt/otobo-docker/.env /opt/otobo-docker/.env.tmp

# create a new backupfile including kerberos settings
docker_admin>cp /opt/otobo-docker/.docker_compose_env_https_kerberos /opt/otobo-docker/.env
Now copy your existing configuration options to the new .env file (at least OTOBO_DB_ROOT_PASSWORD, OTOBO_NGINX_SSL_CERTIFICATE, OTOBO_NGINX_SSL_CERTIFICATE_KEY) and insert the following Kerberos settings:
# Kerberos keytab OTOBO_NGINX_KERBEROS_KEYTAB=/opt/otobo-docker/nginx-conf/krb5.keytab
# Kerberos config (Important, please comment out this option like here!) # In default configuration the krb5.conf file is generated automatically # OTOBO_NGINX_KERBEROS_CONFIG=/opt/otobo-docker/nginx-conf/krb5.conf
# Kerberos Service Name OTOBO_NGINX_KERBEROS_SERVICE_NAME=HTTP/otrs32-centos6.otrs.local # -> Picture Number 1
# Kerberos REALM OTOBO_NGINX_KERBEROS_REALM=ROTHER-OSS.COM -> OTRS.LOCAL # -> Picture Number 2
# Active Directory Domain Controller / Kerberos kdc OTOBO_NGINX_KERBEROS_KDC=
# Active Directory Domain Controller / Kerberos Admin Server OTOBO_NGINX_KERBEROS_ADMIN_SERVER=rother-oss.com
# Kerberos Default Domain OTOBO_NGINX_KERBEROS_DEFAULT_DOMAIN=otrs.local
Start OTOBO
After the initial Kerberos configuration we start OTOBO again:
# Start OTOBO using docker-compose
docker_admin> docker-compose up -d
Tell OTOBO to use the Kerberos-Authentication
In case you have configured AD-Authentication, de-activate it (e.g. by commenting out the respective lines from your Kernel/Config.pm). The authentication will not take place via LDAP anymore.
To use Kerberos-Authentication take the Kerberos-lines from Kernel/Config/Defaults.pm and put it into you Kernel/Config.pm E.g. these lines could work:
$Self->{AuthModule} = 'Kernel::System::Auth::HTTPBasicAuth';

# In case you need to replace some part of the REMOTE_USER, you can
# use the following RegExp ($1 will be new login).
$Self->{'AuthModule::HTTPBasicAuth::ReplaceRegExp'} = '^(.+?)@.+?$';
Configure Browser to understand Kerberos SSO
For SSO to work, the browser must be configured accordingly.
Chrome, Edge, Internet Explorer, etc.
Add page under local or trusted pages and activate ‘Integrated Windows Authentication’ (Internet Options).
Firefox
Enter “about:config” in the firefox address line
and change the following settings:
network.negotiate-auth.trusted-uris = https:// (or https://otobofqdn)
network.negotiate-auth.delegation-uris = http:// (or https://otobofqdn)
Debugging and Problems
If the Kerberos SSO does not work, please check first if the NGINX container is started:
# Check Container
docker_admin> docker ps
In the next step please check the NGINX logs for more information:
# Check NGINX logs
docker_admin> docker logs otobo_nginx_1 -f
If NGINX is running, please login into the NGINX Container and check all needed files:
# Login to the NGINX Container
docker_admin> docker exec -it otobo_nginx_1 bash

# Now please check if the krb5.conf file exists with your needed values
nginx_root> cat /etc/krb5.conf

# Now please check if the krb5.keytab file exists
nginx_root> cat /etc/krb5.keytab

# If not, please quit from the container and copy the file again using docker
docker_admin> docker cp /opt/otobo-docker/nginx-conf/krb5.keytab otobo_nginx_1:/etc/krb5.keytab
Kerberos debugging
 # Login to the NGINX Container
docker_admin> docker exec -it otobo_nginx_1 bash
Now you are able to debug the Kerberos settings. Examples:
env KRB5_TRACE=/dev/stdout kvno HTTP/otrs32-centos6.otrs.local@OTRS.LOCAL
klist -e
kinit -VV -k -t /etc/krb5.keytab HTTP/otrs32-centos6.otrs.local@OTRS.LOCAL
kinit username@OTRS.LOCAL
In case you stumble upon the issue that apparently the authentication works but the agent is not yet in the database, then your sync (if implemented) might not work. An error 52e (First bind failed) indicates that something is wrong with your Search User. This happens if you use the same user for the AD sync and as a SSO user. Please use seperate AD users for that. In order to not have to create a new keytab and having to repeat the steps mentioned above, it could be easier to create a new user to use in your AD sync (probably in your Kernel/Config.pm).
In case SSO is not working properly, make sure: * the user for which it is not working is in Active Directory * the system has to be in the domain * it is properly stated as a trusted page (see ‘Configure Browser to understand Kerberos SSO’)