OTOBO Docker 安装中的 Kerberos 单点登录
请阅读 安装应用 Docker和Docker Compose 一章,了解安装和配置 OTOBO 的基本信息。本教程假定已经使用 Docker 安装和配置了 OTOBO。
Note
在下文中,我们将以 AD(活动目录)为参照,当然在 LDAP 下也可以进行 Kerberos 配置。
生成活动目录用户
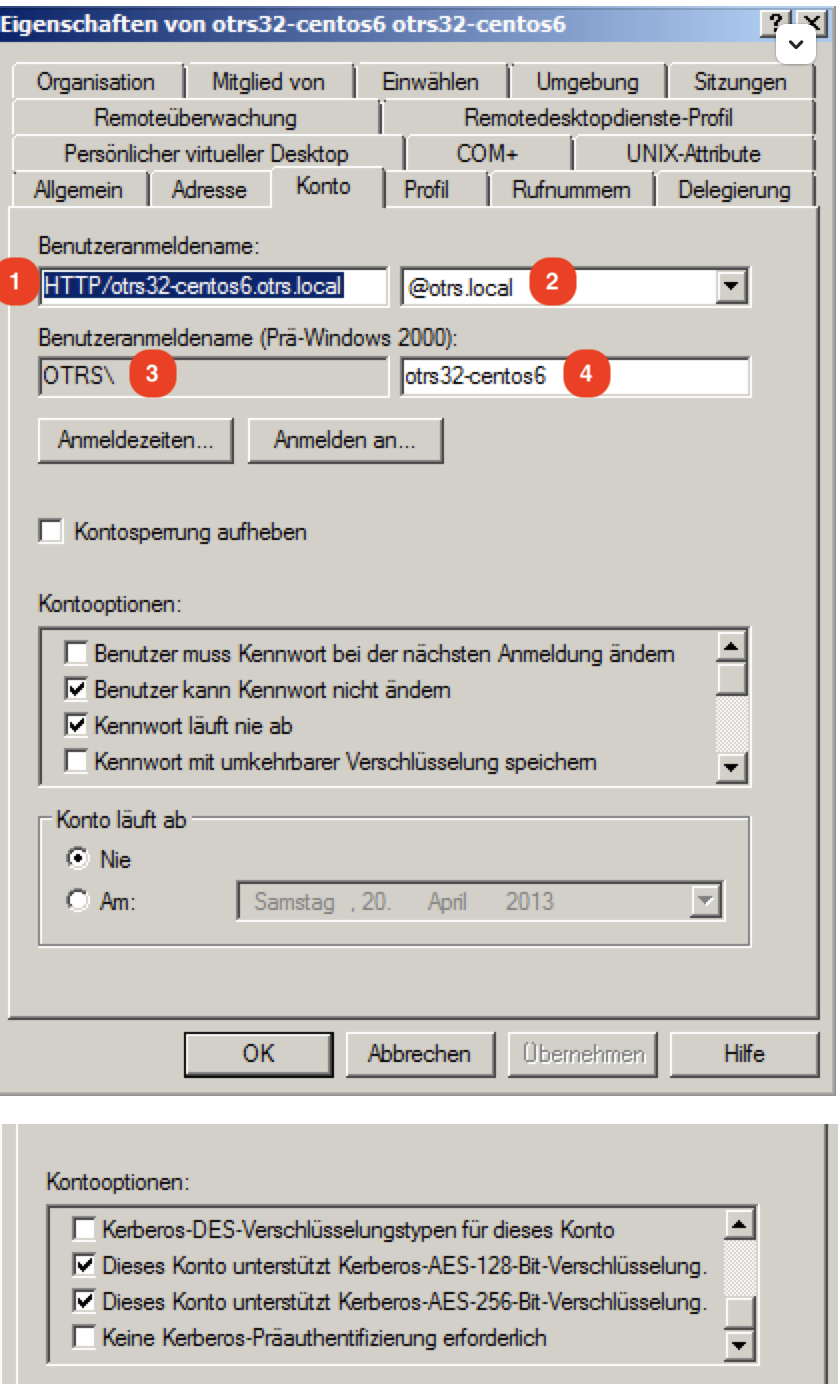
请使用以下设置创建一个新的 Active Directory 用户,并保存标记的设置:
Note
请仅使用以下语法作为用户名:HTTP/fqdn.from.your.otobo.de"。fqdn.from.your.otobo.de "必须是 A-Record DNS 条目,而不是 CNAME!在下一步中,也可以为 OTOBO 使用其他 URL,但它们必须以 CNAME 的形式指向我们上面定义的 A-Record。
用户名部分 "HTTP/"应使用大写字母,因为 Kerberos 希望这样写。
密码在使用某些特殊字符(如"&")时无法正常工作。
您必须创建一个单独的 AD 用户。不能使用已用于 LDAP/AD 同步的用户。

生成 Active Directory Keytab 文件
下一步,我们连接到 Active Directory 的域控制器,并以管理员权限打开控制台 (cmd)。现在,我们使用工具 ktpass.exe 生成所需的密钥表文件:
ktpass.exe -princ HTTP/otrs32-centos6.otrs.local@OTRS.LOCAL -mapuser OTRS\otrs32-centos6 -crypto All -pass Password -ptype KRB5_NT_PRINCIPAL -out c:\krb5.keytab
- -princ = HTTP/otrs32-centos6.otrs.local@OTRS.LOCAL -> 图片编号 1+@+ 图片编号 2`
- -mapuser = OTRSotrs32-centos6 (Username prä Win 2000) -> -> Picture Number 3++Picture Number.
- `-pass = 用户 otrs32-centos6 的密码(Active Directory 用户)"。
- -out = c:/krb5.keytab
Note
请使用大写字母输入域名 (@OTRS.LOCAL)。密码不得包含特殊字符。
下一步,请将 krb5.keytab 文件移至 OTOBO 服务器:
# Create new directory
docker_admin> mkdir /opt/otobo-docker/nginx-conf

# Move the file krb5.keytab to the new directory (Attention, depending on where you have placed the krb5.conf file, the command below will change.)
docker_admin> mv ?/krb5.keytab /opt/otobo-docker/nginx-conf/krb5.keytab
为自定义 nginx 配置创建新卷
docker volume create otobo_nginx_custom_config
otobo_nginx_custom_config_mp=$(docker volume inspect --format '{{ .Mountpoint }}' otobo_nginx_custom_config)
docker create --name tmp-nginx-container rotheross/otobo-nginx-webproxy:latest-10_1 (achtung: Versionsnummer)
docker cp tmp-nginx-container:/etc/nginx/templates /tmp
docker cp tmp-nginx-container:/etc/nginx/templates/otobo_nginx-kerberos.conf.template.hidden $otobo_nginx_custom_config_mp/otobo_nginx.conf.template
docker rm tmp-nginx-container
vim docker-compose/otobo-nginx-custom-config.yml
COMPOSE_FILE =>
docker-compose/otobo-nginx-custom-config.yml
NGINX_ENVSUBST_TEMPLATE_DIR=/etc/nginx/config/template-custom
创建新的 OTOBO .env 文件
首先,我们需要将旧文件 /opt/otobo-docker/.env 移到 .env.tmp 并创建一个新的 .env 文件,其中包括 kerberos 设置。
# Stop OTOBO Container if running
docker_admin>cd /opt/otobo-docker
docker_admin>docker-compose down

# create a backup of the old .env file
docker_admin>mv /opt/otobo-docker/.env /opt/otobo-docker/.env.tmp

# create a new backupfile including kerberos settings
docker_admin>cp /opt/otobo-docker/.docker_compose_env_https_kerberos /opt/otobo-docker/.env
现在将现有的配置选项复制到新的 .env 文件中(至少包括 OTOBO_DB_ROOT_PASSWORD、OTOBO_NGINX_SSL_CERTIFICATE、OTOBO_NGINX_SSL_CERTIFICATE_KEY),并插入以下 Kerberos 设置:
# Kerberos 密钥表 OTOBO_NGINX_KERBEROS_KEYTAB=/opt/otobo-docker/nginx-conf/krb5.keytab
# 在默认配置中,krb5.conf 文件会自动生成 # OTOBO_NGINX_KERBEROS_CONFIG=/opt/otobo-docker/nginx-conf/krb5.conf
# Kerberos 服务名称 OTOBO_NGINX_KERBEROS_SERVICE_NAME=HTTP/otrs32-centos6.otrs.local # -> 图片编号 1
# Kerberos REALM OTOBO_NGINX_KERBEROS_REALM=ROTHER-OSS.COM -> OTRS.LOCAL # -> 图片编号 2
# 活动目录域控制器/Kerberos kdc OTOBO_NGINX_KERBEROS_KDC=
# 活动目录域控制器/Kerberos 管理服务器 OTOBO_NGINX_KERBEROS_ADMIN_SERVER=rother-oss.com
# Kerberos 默认域 OTOBO_NGINX_KERBEROS_DEFAULT_DOMAIN=otrs.local
启动 OTOBO
初始 Kerberos 配置完成后,我们再次启动 OTOBO:
# Start OTOBO using docker-compose
docker_admin> docker-compose up -d
告诉 OTOBO 使用 Kerberos 验证
如果您配置了 AD 身份验证,请将其停用(例如注释掉 Kernel/Config.pm 中的相应行)。身份验证将不再通过 LDAP 进行。
要使用 Kerberos 身份验证,请将 Kernel/Config/Defaults.pm 中的 Kerberos 行放到 Kernel/Config.pm 中:
$Self->{AuthModule} = 'Kernel::System::Auth::HTTPBasicAuth';

# In case you need to replace some part of the REMOTE_USER, you can
# use the following RegExp ($1 will be new login).
$Self->{'AuthModule::HTTPBasicAuth::ReplaceRegExp'} = '^(.+?)@.+?$';
配置浏览器以理解 Kerberos SSO
要使 SSO 正常工作,必须对浏览器进行相应配置。
Chrome、Edge、Internet Explorer 等
在本地或受信任页面下添加页面,并激活 "集成 Windows 身份验证"(Internet 选项)。
火狐
在 firefox 地址栏中输入 "about:config
并更改以下设置:
- network.negotiate-auth.trusted-uris = https://(或 https://otobofqdn)
- network.negotiate-auth.delegation-uris = http://(或 https://otobofqdn)
调试和问题
如果 Kerberos SSO 无法正常工作,请首先检查 NGINX 容器是否已启动:
# Check Container
docker_admin> docker ps
下一步,请查看 NGINX 日志以获取更多信息:
# Check NGINX logs
docker_admin> docker logs otobo_nginx_1 -f
如果 NGINX 正在运行,请登录 NGINX 容器并检查所有需要的文件:
# Login to the NGINX Container
docker_admin> docker exec -it otobo_nginx_1 bash

# Now please check if the krb5.conf file exists with your needed values
nginx_root> cat /etc/krb5.conf

# Now please check if the krb5.keytab file exists
nginx_root> cat /etc/krb5.keytab

# If not, please quit from the container and copy the file again using docker
docker_admin> docker cp /opt/otobo-docker/nginx-conf/krb5.keytab otobo_nginx_1:/etc/krb5.keytab
Kerberos 调试
 # Login to the NGINX Container
docker_admin> docker exec -it otobo_nginx_1 bash
现在您可以调试 Kerberos 设置了。示例
env KRB5_TRACE=/dev/stdout kvno HTTP/otrs32-centos6.otrs.local@OTRS.LOCAL
klist -e
kinit -VV -k -t /etc/krb5.keytab HTTP/otrs32-centos6.otrs.local@OTRS.LOCAL
如果您遇到这样的问题,即身份验证显然有效,但代理尚未进入数据库,那么您的同步(如果已实施)可能无法进行。错误 52e(首次绑定失败)表明搜索用户出了问题。如果在 AD 同步和 SSO 用户中使用同一个用户,就会出现这种情况。请使用不同的 AD 用户。为了避免创建新的 keytab 和重复上述步骤,可以创建一个新用户用于 AD 同步(可能在 Kernel/Config.pm 中)。
如果 SSO 无法正常工作,请确保* 系统必须位于域中 * 已正确声明为受信任页面(请参阅 "配置浏览器以了解 Kerberos SSO")。